This blog post discusses the challenges of pipeline integrity management and the new PLX-Portable testing device can help pipeline operators meet the requirements of PHMSA's Mega Rule for material verification.
Legislation – PHMSA & The Mega Rule
Integrity management of pipelines is a complex issue, and global legislations exist to guarantee their safe operation. In the US, the Pipeline & Hazardous Materials Safety Administration (PHMSA), part of the Department of Transportation, sets the rules and regulations in this domain - with their most recent 'Mega Rule' legislation demonstrating just how critical pipeline integrity is at a national level. Such guidelines establish standards for the design, construction, operation, and maintenance of pipelines. They might also provide guidelines for conducting integrity assessments and developing integrity management plans, as well as determining the roles and responsibilities of the various parties involved in the management of pipeline integrity.
In a move to enhance safety for onshore gas transmission pipelines, this new legislation broadens the scope of existing rules and regulations. Industry professionals well-versed in these measures will find that several additions have been included with an emphasis on ensuring maximum safety, such as additional material verification requirements and re-confirmation of Maximum Allowable Operating Pressure (MAOP).
The Mega Rule ensures that pipelines are operating safely and remain in good condition by requiring operators to implement comprehensive Integrity Management Programmes. These programmes assess potential risks, such as cracks or corrosion, and take corrective steps where needed, thereby ensuring optimal performance is maintained (as much as is feasibly possible) across all pipeline infrastructure.
Pipeline Integrity Management – Methods & Tools
Of course, the legislative frameworks are helpful, but the importance of pipeline integrity management is already well understood in an industry that has, historically, prioritised safety, and spent billions of dollars implementing these complex integrity management programmes. These programmes are geared towards the detection, classification, and remediation of defects including, but not limited to, those that are listed below:
- Corrosion, or the deterioration of material due to its exposure to environments that contain, for example, water, salts, and other contaminants that can facilitate unwanted chemical reactions.
- Cracks, which can occur in pipelines due to various reasons, including manufacturing defects, applied loads (stresses), and corrosion.
- Dents, which are often present after some type of localized impact event, can weaken the pipeline and accelerate its failure.
- Weld defects that arise in many different forms during welding processes, often exacerbated by the creation of large residual stresses, and the complex evolution of unwanted microstructural features.
- Manufacturing defects that were introduced during the manufacturing process.
In addition, it’s well recognized that pipeline failures are serious incidents with potentially significant consequences that include environmental damage, injury, and, in the worst cases, fatalities. They also result in costly repairs, and in significant disruption to the supply of energy, with the recent spill from the Keystone pipeline (December 2022) being just one example. Integrity management programs are designed to prevent these types of incidents by identifying and addressing such issues before they become hazardous, but it is an ongoing process that involves inspecting and testing the pipelines and monitoring their condition on a regular basis. There are established tools and methods for doing so; some of the most common include:
- Visual inspection, which is considered the first line of defence in detecting defects in pipelines. It can be performed manually by trained personnel using visual inspection equipment including remotely operated vehicles and drones.
- Ultrasonic testing, whereby disturbances in the patterns of high-frequency sound waves are correlated to certain types of defects.
- Hydrostatic testing, which involves pressurizing the pipeline with water or another liquid to check for leaks.
- In-line inspection using “smart pigs” that are inserted into pipelines with instruments that can detect a variety of defects using ultrasonic, magnetic, and radiographic techniques.
- Corrosion monitoring for detecting and monitoring the initiation and evolution of corrosion.
However, new tools are also now emerging, and primarily in response to the requirements set out in Part One of the Mega Rule legislation around MAOP reconfirmation and material verification. In both cases it is necessary to measure the yield and/or tensile strength of the metal (steel) pipelines. The MAOP, for example, is determined from a calculation involving the yield strength.

Satisfying Material Verification Requirements – A New Way
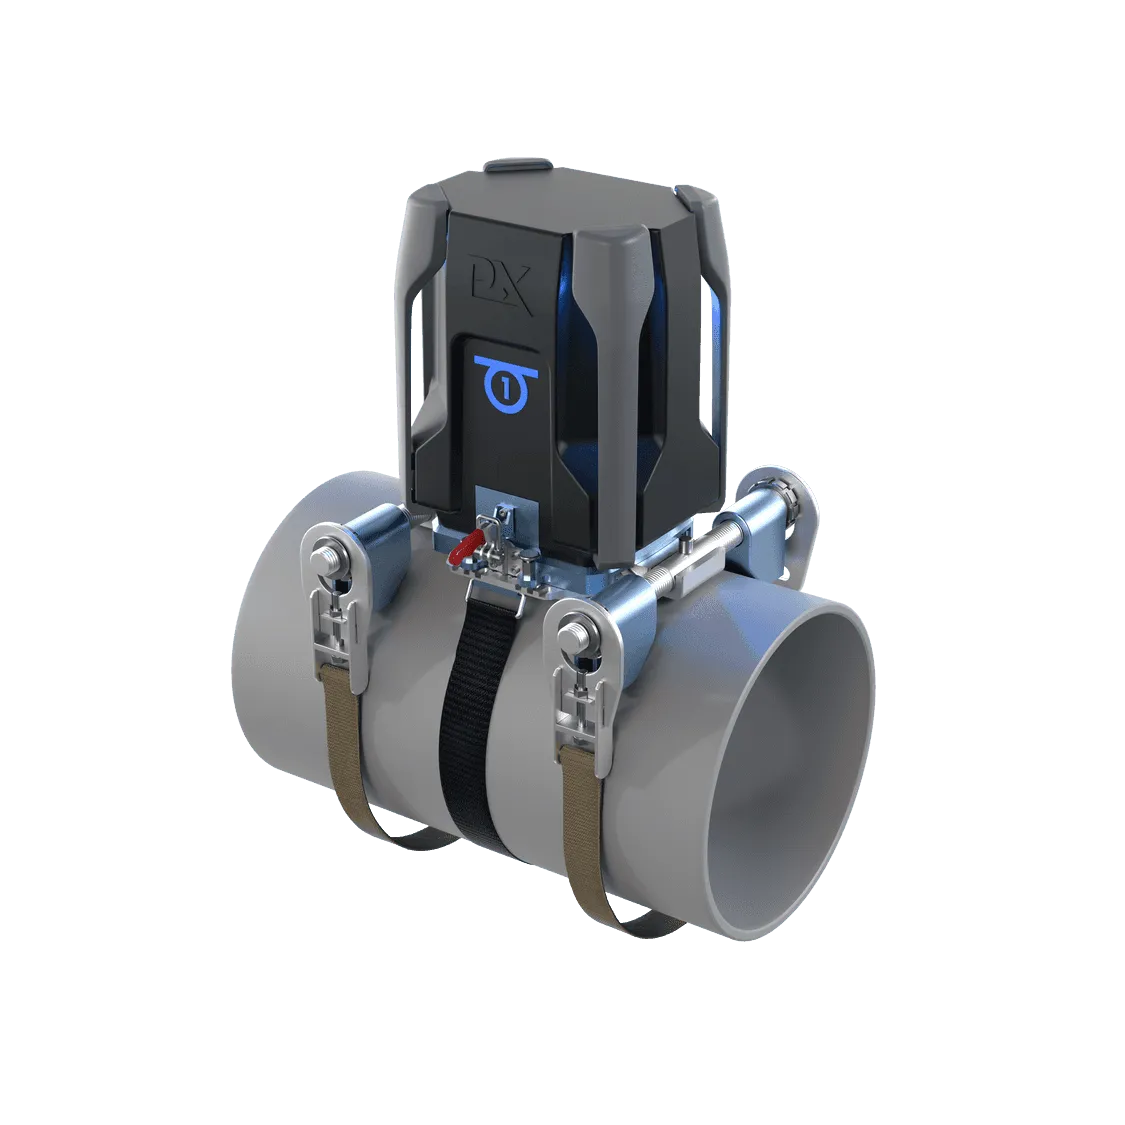
One of these new tools is the portable Indentation Plastometer (Fig.1) from Plastometrex. This is a device for in-ditch measurement of yield and tensile strength to support Positive Material Identification (PMI) and pipe grade determination. The portable device is a derivative of the company’s current flagship product, which is a benchtop Indentation Plastometer that was released commercially in January 2021. The benchtop Indentation Plastometer performs a “PIP” test, which is simply an indention test that is conducted in much the same way that a hardness test is.
The main difference between a PIP test and a hardness test is that PIP test data are used to calculate metal stress-strain curves (not hardness numbers), thereby capturing important strength parameters such as the 0.2% proof stress and the stress at 0.5% elongation under load. To do this, the device measures the full shape of the indent using an optical profilometer (which takes just a few seconds) and passes this data through a proprietary software package that combines an accelerated inverse finite element analysis with optimisation algorithms to derive stress-strain curves.
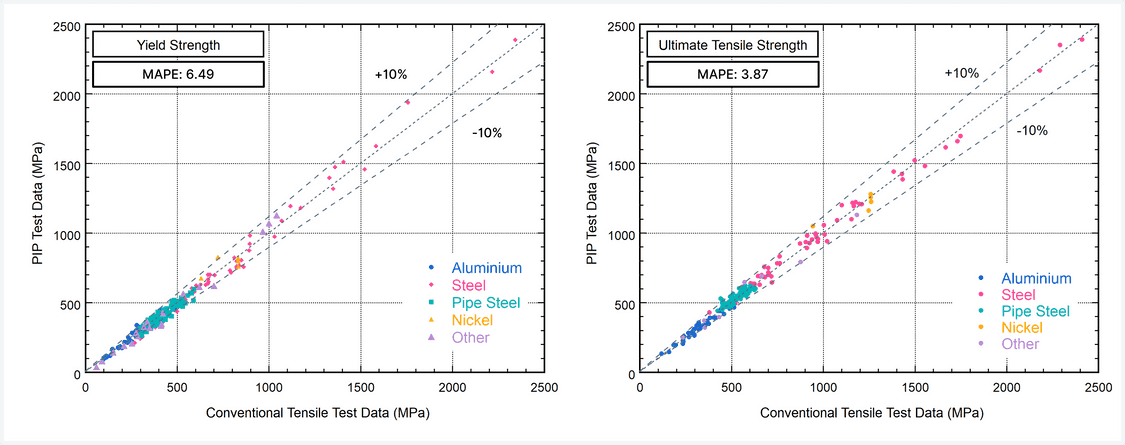
The underlying scientific methodology is already proven, having been developed by former University of Cambridge Scientists, and validated by some of the world’s largest technology companies and most prestigious universities. Comparison data for the benchtop Indentation Plastometer are shown in Fig.2. A common metric for assessing the level of agreement between the PIP test data and conventional tensile test data is the Mean Absolute Percentage Error (MAPE). MAPE values for the benchtop Indentation Plastometer are provided in the figure.

The portable Indentation Plastometer uses the same scientific approach as the benchtop Indentation Plastometer, albeit deployed in a different (portable) configuration (see Fig.1). Industry representatives are now asking, justifiably, for validation data for the portable device that is equivalent to what is presented in Fig.2, not least because such data exists for competing technologies already operating in the PMI space. Data for those technologies were acquired during a PRCI (Pipeline Research Council International) funded project which concluded in 2018 (report number PR-335-173816), and it is evidently clear that the Plastometrex solution for in-ditch PMI should perform comparably to (or better than) those technologies if it is to be successful commercially.
Validation Work
The necessary validation testing project for the portable Indentation Plastometer is now well underway, with support and/or contributions from TC Energy, PG&E, ROSEN, ADV Integrity, the Integrity Assessment Group, The PRCI, RSI Pipeline Solutions, Blade Energy, and Structural Integrity Associates. The objective of the project is to test almost 200 pipeline samples, and to compare portable PIP test results with conventional tensile test results (which have been tested in accordance with the specifications laid out in API 5L).

The project started in January 2023 and some early results are presented in Fig.3, where the MAPE figures are better than those of the two competing technologies when compared with data from the PRCI report of 2018. However, at the time of writing this article, the validation project is several months from completion, and the MAPE numbers for the portable Indentation Plastometer will inevitably change, so final judgement on the accuracy of the tool is currently being reserved. Nevertheless, the early signs are encouraging, and confirmation of accuracy levels will undoubtedly help as the company moves to commercialise the technology later this year, but there are other characteristics of the device that are expected to strengthen the case for its inclusion in integrity management programmes. For example, the system is modular, requiring only one minimally trained technician to operate the device. This is likely to be an advantage as owner/operators and service providers seek to scale their teams to satisfy the enormous testing demand that has been created by the Mega Rule legislation. In addition, a software wizard guides users through the testing process in an automated way, minimising the scope for user error, and a full quadrant can be tested in under 30 minutes.
Importantly, full strength data are available immediately and there is no requirement for the data to be finessed or in some way augmented off-site (which is a characteristic of some PMI tools). Finally, the device is linked to a cloud-based digital platform called PLXUS, which automatically stores the testing data in TVC-compliant form. This capability also enables engineering teams that are situated away from the dig to provide remote assistance to colleagues that are in-the-ditch, thereby enabling real-time decision-making based on real-time data. These attributes are already generating interest and excitement amongst industry representatives ahead of the commercial launch later this year.
The validation project is expected to conclude in the summer of 2023, with pre-orders (subject to successful validation) being taken now.


