Step 1: Indent sample
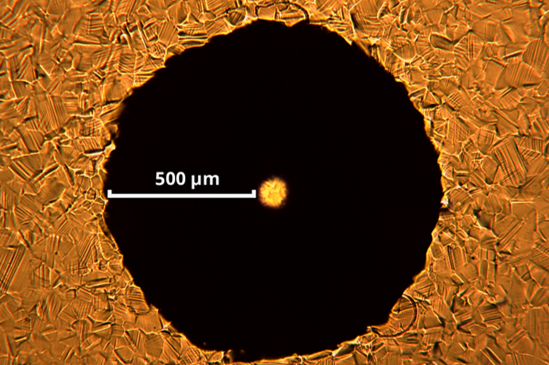
To indent the sample, PIP uses a selection of hard spherical indenters, ranging from ~0.25-1 mm in width. The load during indentation is adjusted to create a residual indent profile that is ~25-200 µm deep. Indent size is a point of differentiation from other indentation-based methods, such as nano-indentation. A PIP indent is large in comparison to the microstructure of most metallic materials, which means that the indent is probing the bulk material response, rather than individual grains.
FIGURE 1, shows an example indent to a depth of 180 µm with a 1 mm radius indenter in a nickel-based superalloy sample. The resulting indent is ~1 mm in diameter and is large relative to the grain size of the material, meaning that the bulk material response is probed.

Step 2: Measure shape
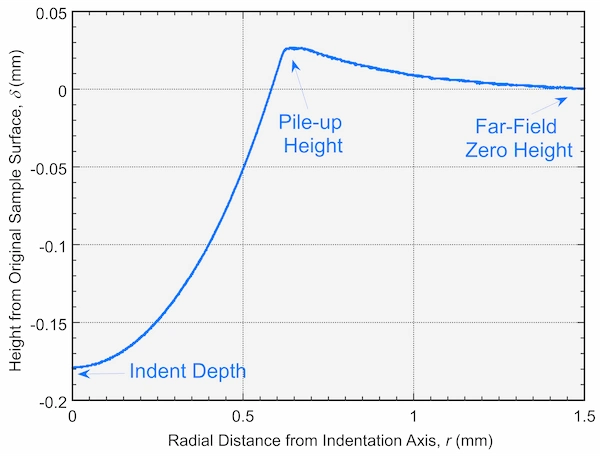
The full 3D shape of the residual indent profile is measured using either a stylus profilometer (on the PLX-Benchtop) or an interferometer (on the PLX-Portable). This is a point of differentiation from a hardness test, where only the diameter of an indent is measured - find out more about the differences between PIP and hardness testing here.
The full residual indent profile, including the indent depth, pile-up region and the far field-zero height (which is where the material is unaffected by the indent which has been created), is a much richer source of information about the mechanical properties of the material than the diameter of the indent alone. An example residual indent profile is shown in FIGURE 2.

Step 3: Finite element analysis
Now that the shape of the indent has been measured, the metal’s stress-strain curve is determined via a constitutive plasticity equation, conducted in three steps:
- Starting with a trial set of plasticity parameters, a finite element model of the indentation is run.
- A comparison is then made between modelled and measured residual indent profiles.
- The plasticity parameters are then iteratively updated until the best agreement between profiles is achieved.
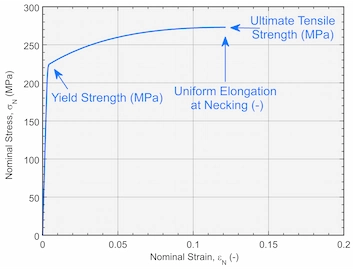
These optimised plasticity parameters therefore define the stress-strain curve of the material, an example of which is shown in FIGURE 3.

strength, ultimate tensile strength and uniform elongation at necking.
Summary
PIP testing is an indentation-based test to determine the stress-strain properties of metallic materials. It can be applied to all metals on the PLX-Benchtop, at high temperature on the PLX-HotStage or in the field on the PLX-Portable. The three steps of indentation, measurement of the residual indent profile, and accelerated inverse finite element analysis to determine the stress-strain curve, are all carried out automatically in proprietary software packages built by Plastometrex.
See how yield strength and ultimate tensile strength data obtained by PIP compares with tensile test values in the interactive comparison data here.

